Google has introduced a groundbreaking approach to fine-tuning large language models (LLMs) with Tunix on TPUs. This method leverages autonomous AI agents to optimize post-training workflows, making it easier for beginners to achieve better model performance without extensive manual intervention.

What is Autonomous LLM Post-Training?
Autonomous LLM post-training involves using AI agents to automate the fine-tuning process. Instead of manually adjusting hyperparameters and monitoring training sessions, you define the parameters and let the AI agent handle the rest. This approach significantly reduces the time and effort required to optimize LLMs.
Traditional vs. Autonomous Fine-Tuning
| Aspect | Traditional Fine-Tuning | Autonomous Fine-Tuning |
|---|---|---|
| Hyperparameter Tuning | Manual adjustments | Automated by AI agents |
| Monitoring | Manual monitoring of loss curves | Automated monitoring and logging |
| Iteration Speed | Slow, manual iterations | Fast, automated iterations |
| Error Handling | Manual reverts and fixes | Automated reverts and commits |
How It Works
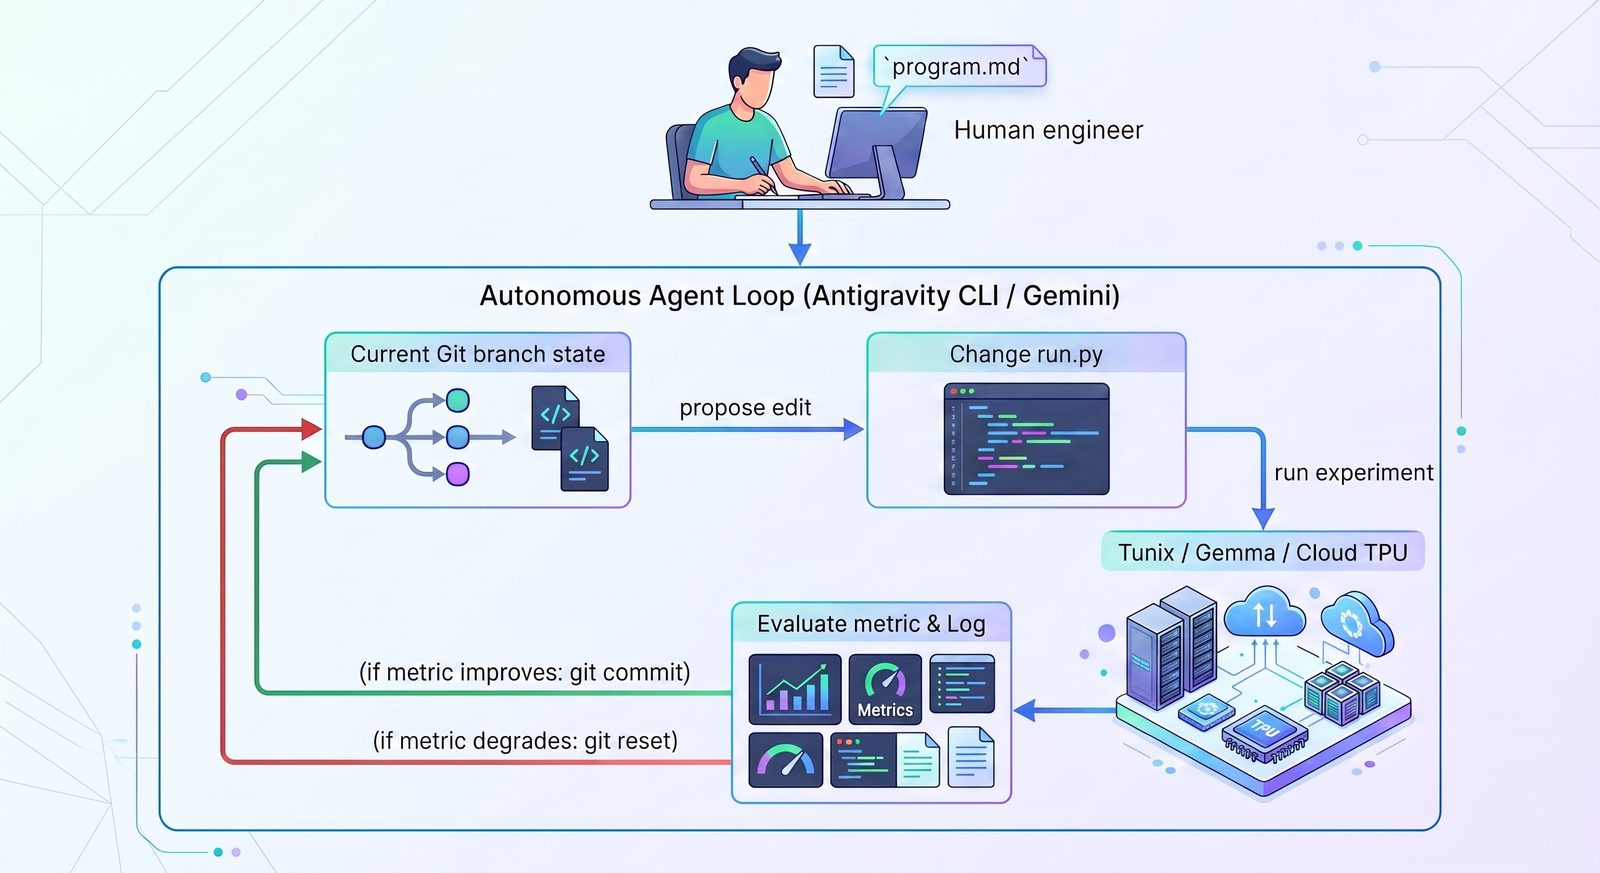
The autonomous fine-tuning process involves three main steps:
- Design the Arena: Define the loop, boundary conditions, evaluation criteria, and constraints in a Markdown file (
program.md). - Provide the Execution Code: Create a clean, self-contained fine-tuning script (
run.py). - Let the Agent Iterate: The AI agent modifies the script, runs the training job, measures the target metric, retains winning commits or reverts regressions, and logs results in
results.tsv.
Case Study 1: Supervised Fine-Tuning (SFT) on FunctionGemma
In this experiment, Google fine-tuned the google/functiongemma-270m-it model on the google/mobile-actions dataset using Cloud TPU v5e-1. The AI agent was given boundaries in program.md:
- Allowed: LoRA rank/alpha, target projection layers, learning rates, warmup/decay schedules, optimizers (e.g., AdamW/Muon), gradient clipping, batch size, and seeds.
- Disallowed: Changing the dataset, number of epochs, or model architecture.
The agent ran 20 automated experiments in a couple of hours, continuously improving the model’s accuracy in generating correct function calls.
Case Study 2: Reinforcement Learning (GRPO) on Gemma for Math Reasoning
In this more complex experiment, Google used the Tunix repository to train the Gemma 3 1B model for math reasoning using the GSM8K dataset. The setup included:
- Hardware: Cloud TPU v6e-1
- Model: Gemma 3 1B
- Dataset: GSM8K
- Iteration Speed: A couple of hours per run
- Run Duration: 40 experiments over 2–3 days
- Objective Metric:
Post_RL_metric(numerical_accuracy + format_accuracy)
The agent identified better LoRA configurations, rollout temperature, KL penalty, and system prompt, improving the total reward by ~10%.
Benefits for Beginners
For beginners, autonomous LLM post-training offers several advantages:
- Reduced Complexity: Automates the complex and repetitive aspects of fine-tuning.
- Faster Iterations: Speeds up the experimentation process, allowing for quicker improvements.
- Better Results: Achieves optimal model performance with minimal manual intervention.
Tip
Start by exploring the autofinetune GitHub repository to understand the templates and sample runs. This will give you a solid foundation to build your own autonomous post-training workflows.
Getting Started
To get started with autonomous LLM post-training, follow these steps:
- Set Up Your Environment: Ensure you have access to Google Cloud TPUs and the necessary libraries.
- Define Your Parameters: Create a
program.mdfile to define your fine-tuning parameters and constraints. - Run Your Script: Use the
run.pyscript to initiate the fine-tuning process. - Monitor Progress: Check the
results.tsvfile for detailed logs of the agent’s progress.
Conclusion
Google’s Tunix and autonomous fine-tuning represent a significant leap forward in LLM optimization. By automating the fine-tuning process, beginners can achieve better results with less effort, allowing them to focus on higher-level tasks. As you explore this new paradigm, remember that the key to success lies in understanding the tools and methodologies involved.
Want to try all of this hands-on? Start with the free Claude Code from Zero course.
Source
Based on Google’s announcement, “Autonomous LLM post-training with Tunix on TPUs”. Written for people learning to build with these tools.